The living room is where daily life happens. It is where you relax after work, host friends, watch films, and — if you work from home — possibly where you spend your entire day. Despite this, living rooms are often the last room homeowners think about renovating. Kitchens and bathrooms get the headlines, but a well-planned living room renovation can transform how your home feels every single day.
Unlike a kitchen renovation or bathroom renovation, a living room renovation gives you more creative freedom — but that freedom can lead to indecision. This guide walks through every decision, from layout to lighting, and helps you build a clear scope of work before you talk to a contractor.
Defining your living room renovation scope
Before you start browsing inspiration images, get honest about what your living room actually needs. The scope could range from a simple cosmetic refresh to a structural overhaul.
Levels of living room renovation
Cosmetic refresh ($2,000-$8,000)
- Fresh paint or wallpaper on feature walls
- New curtains or blinds
- Updated light fixtures
- Rearranged furniture with a few new pieces
- New cushions, throws, and decorative items
Mid-range remodel ($8,000-$25,000)
- New flooring throughout
- Recessed or layered lighting with new wiring
- Built-in storage or shelving
- Fireplace update or surround replacement
- New skirting boards/baseboards and architraves/door casings
- Replastering walls
Full renovation ($25,000-$60,000+)
- Structural changes (removing walls to create open plan)
- Complete rewiring and new lighting design
- Underfloor heating
- Custom joinery (built-in units, window seats, media walls)
- New windows or doors (including bi-fold or sliding doors to a garden)
- Full replaster and decoration
Understanding which level matches your budget prevents scope creep — the gradual expansion of work that inflates costs and delays timelines. Write down your priorities before you start, and refer back to them when temptation strikes.
Planning your living room layout
Layout is the foundation of a successful living room. Get this right and the room flows naturally. Get it wrong and no amount of expensive furniture will fix it.
Assess how you actually use the room
Before drawing layouts, answer these questions honestly:
- How many people regularly use this room at once? A couple has different needs to a family of five.
- What activities happen here? TV watching, reading, conversation, homework, gaming, working from home?
- Do you entertain? Regularly hosting 8+ guests changes the layout calculation.
- Is this an open-plan space? If the living room flows into a kitchen or dining area, the layout must work with adjacent zones.
- Do children or pets use the room? This affects material choices and storage needs.
Common living room layouts
Conversation layout — sofas and chairs face each other across a coffee table. Best for households that prioritise talking over TV watching. Works well in period properties with a fireplace as the focal point.
Entertainment layout — seating oriented toward a TV or screen. The most common arrangement. Ensure the TV is at eye level when seated (centre of screen at approximately 1.1m/42” from the floor) and that no seat is more than 3-4m (10-13’) from the screen for comfortable viewing.
Multi-zone layout — larger rooms divided into functional zones: a seating area, a reading nook, a workspace, a play area. Use rugs, lighting changes, and furniture placement to define zones without walls.
Open-plan integration — the living area shares space with kitchen and/or dining. Define the living zone with a large rug, a change in flooring material, or a sofa placed perpendicular to the traffic flow as a soft room divider.
Traffic flow and measuring
Traffic flow is often overlooked. Leave at least 900mm (36”) for primary walkways and 450mm (18”) between furniture pieces. Never place a sofa so the main walkway cuts between seating and the TV or fireplace.
Before committing to a layout, measure your room and draw it to scale. Graph paper works, but free online room planners let you drag and drop furniture. Measure:
- Room dimensions (length, width, ceiling height)
- Window positions and sizes
- Door positions and swing direction
- Radiator positions
- Socket and switch positions
- Any alcoves, chimney breasts, or structural columns
This measured plan is invaluable when you later discuss the project with a general contractor or tradesperson.
Choosing living room flooring
Flooring has the single biggest visual impact in a living room. It covers every square metre of the space and sets the tone for everything above it.
Flooring options compared
| Flooring type | Durability | Comfort underfoot | Cost per m2/sq ft | Maintenance | Best for |
|---|---|---|---|---|---|
| Engineered hardwood | High | Warm | $$-$$$ | Low-medium | Premium feel, long-term value |
| Solid hardwood | Very high | Warm | $$$-$$$$ | Medium | Period properties, longevity |
| Luxury vinyl tile (LVT) | Very high | Warm | $$ | Very low | Families, pets, high traffic |
| Laminate | Medium | Neutral | $ | Low | Budget-friendly, easy install |
| Carpet | Low-medium | Very warm | $-$$ | High | Bedrooms, cosy spaces |
| Porcelain tile | Very high | Cold (without UFH) | $$-$$$ | Very low | Modern/minimalist, underfloor heating |
| Natural stone | Very high | Cold (without UFH) | $$$-$$$$ | Medium-high | Statement spaces, period properties |
Key considerations for living room flooring
- Subfloor condition determines what you can install. Concrete suits most options. Timber subfloors may need reinforcing for stone or tile.
- Underfloor heating compatibility. Engineered hardwood, LVT, and tile work well with UFH. Thick carpet reduces UFH efficiency.
- Acoustic performance. Hard floors can feel echoey — use acoustic underlay, especially in apartments.
- Transitions. Plan how your living room floor meets adjacent rooms. Same-level transitions with flush threshold strips look best.
- Always order samples and view them in your actual room, in both daylight and artificial light.
Lighting design
Lighting is the most underestimated element of a living room renovation. Most homes rely on a single pendant light in the centre of the room, which creates flat, unflattering light with harsh shadows. A layered lighting scheme transforms the atmosphere.
The three layers of lighting
Ambient (general) lighting — the base layer that illuminates the whole room. This replaces your single ceiling pendant. Options include recessed downlights, a flush or semi-flush ceiling fixture, or cove lighting (LED strips concealed in a dropped ceiling edge or cornice).
Task lighting — focused light where you need it. Reading lamps beside sofas, a desk lamp in a work area, or picture lights above artwork. Task lighting should be independently switchable so you can use it without the ambient layer.
Accent lighting — decorative light that creates mood and highlights features. Wall sconces, LED strip lighting behind shelving, uplighters behind plants, or backlit architectural features. Accent lighting adds depth and warmth.
Practical lighting tips
- Dimmer switches on everything. A living room that cannot be dimmed only works at one intensity. Dimmers let you go from bright and functional during the day to warm and relaxed in the evening. Budget $50-$100 per dimmer switch.
- Plan socket and switch positions early. Adding new lighting almost always means new wiring, which means chasing channels into walls before plastering. This work needs to happen before decoration, not after.
- Five to seven light sources. A well-lit living room typically has 5-7 independently controlled light sources across the three layers. This sounds like a lot, but it includes table lamps, floor lamps, and wall lights — not just ceiling fixtures.
- Colour temperature matters. For living rooms, use warm white light (2700K-3000K). Cool white (4000K+) feels clinical in a living space. Ensure all your bulbs match — mixing colour temperatures looks jarring.
- Smart lighting. Smart bulbs or smart switches let you create scenes (movie mode, reading mode, entertaining mode) that adjust multiple lights at once. This is a genuine quality-of-life improvement, not just a gimmick.
Wiring considerations
If your renovation includes new lighting circuits, this is electrical work that needs a qualified electrician. In many jurisdictions, electrical work in habitable rooms must meet building regulations standards and may require inspection. Discuss this with your contractor during the planning phase to avoid surprises.
Storage solutions
Living rooms accumulate more stuff than any other room: books, media equipment, toys, games, blankets, remote controls, chargers, and the miscellaneous items that do not have a home anywhere else. Good storage is the difference between a room that looks tidy and one that always feels cluttered.
Open shelving versus built-in units
Open shelving
- Looks light and airy
- Displays decorative items, books, and plants
- Requires constant curation — everything is visible
- Works best in minimalist or Scandinavian-style interiors
- Floating shelves in alcoves are a popular, affordable option
Built-in units (custom joinery)
- Maximises every centimetre, especially in alcoves beside chimneys
- Combines open display with closed storage (doors or drawers below, open shelves above)
- Hides clutter completely when needed
- More expensive upfront but adds permanent value
- Can integrate TV recesses, lighting, and cable management
Freestanding furniture
- Flexible — you can take it with you when you move
- Available at every price point
- Rarely fits your space as perfectly as built-ins
- Good for renters or homeowners who expect to move within 5 years
Storage planning tips
- Audit what you need to store. Literally count the books, measure the media equipment, and assess the toy collection. Design storage for what you actually own, plus 20% growth.
- Hide the cables. A media wall or TV unit should include cable management channels. Nothing ruins a clean renovation faster than a tangle of cables below the TV.
- Consider a dedicated media wall. A built-in media wall that houses the TV, speakers, streaming boxes, and game consoles behind clean panels is increasingly popular. It requires careful planning for ventilation (electronics generate heat) and cable access.
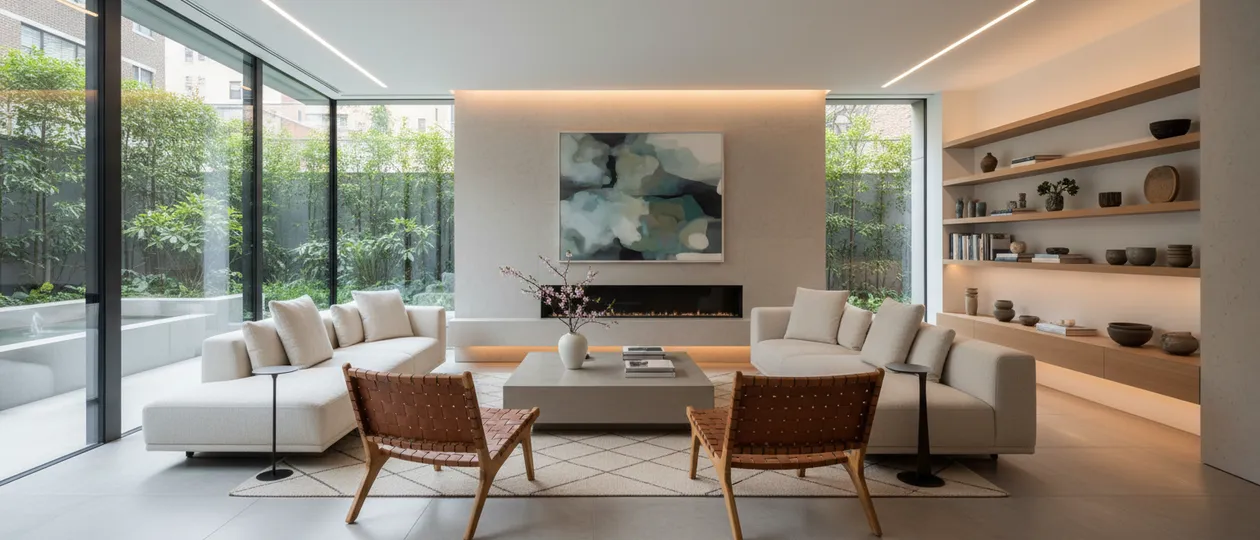
Fireplace updates
If your living room has a fireplace — whether it is a working chimney, a blocked-up opening, or a decorative surround — it will be the natural focal point of the room. Updating it can anchor your entire design.
Options for existing fireplaces
Restore an original fireplace. Many older homes have original fireplaces hidden behind boarding or plaster. Exposing and restoring an original fireplace adds character and value. Check the chimney is structurally sound and have it swept before use.
Replace the surround. Swapping a dated surround (think 1990s marble effect) for a clean stone, wood, or plaster surround modernises the room instantly. Surrounds range from $500 for a simple timber mantel to $5,000+ for natural stone.
Install a modern inset stove. A wood-burning or multi-fuel stove fitted into an existing chimney opening is energy-efficient and visually striking. Check local regulations — some areas (including Smoke Control Areas in the UK and certain US municipalities) restrict what you can burn. You will likely need a HETAS-registered installer (UK) or a licensed hearth professional.
Convert to gas or electric. If you want flame effect without the maintenance of real fire, a gas or electric inset fire is a practical alternative. Modern electric fires are convincingly realistic and require no chimney.
Seal and decorate. If you do not want a fire at all, seal the chimney opening (leave a vent to prevent damp), and use the alcove as a display space with candles, a log stack for decoration, or artwork.
Structural considerations
Opening up a blocked fireplace or modifying a chimney breast is structural work. The chimney breast may be load-bearing, especially on upper floors. Always consult a structural engineer before removing or modifying a chimney breast. This applies even if you are only removing a chimney breast on the ground floor — the structure above needs support. Your general contractor can advise on whether a structural engineer is needed.
Walls, ceilings, and natural light
Surface treatments
- Paint remains the most versatile wall finish. Use matte to hide imperfections, or eggshell for durability in high-traffic areas.
- Feature walls using wallpaper, timber panelling, or textured plaster add depth. Limit to one wall to avoid overwhelming the space.
- Replastering may be necessary in older properties where walls are uneven.
- Ceilings deserve attention too — a fresh coat of white paint makes the room feel taller. Ceiling roses and cornicing add character to period properties.
Maximising natural light
Natural light makes any room feel larger. Consider larger windows (structural work requiring an engineer), bi-fold or sliding doors to a garden ($3,000-$10,000), or skylights for single-storey rooms. Internal glazed partitions borrow light from adjacent spaces without sacrificing separation.
Choose window treatments early — curtains add warmth, roman blinds suit tight spaces, and plantation shutters ($300-$600 per window) offer adjustable light control.
Budgeting your living room renovation
Where the money goes
A typical mid-range living room renovation breaks down roughly as follows:
| Category | Percentage of budget |
|---|---|
| Flooring (material + installation) | 25-30% |
| Lighting (fixtures + wiring) | 10-15% |
| Built-in storage / joinery | 15-25% |
| Walls and ceilings (plastering + decoration) | 10-15% |
| Fireplace updates | 5-15% |
| Windows and doors | 10-20% (if applicable) |
| Contingency | 10-15% |
The contingency rule
Always keep 10-15% of your total budget as contingency — money reserved for unexpected issues. In living room renovations, common surprises include:
- Damp or rot discovered behind walls once plaster is removed
- Electrical wiring that does not meet current standards and needs replacing
- Subfloor issues (uneven, damp, or structurally weak) discovered once old flooring is lifted
- Chimney structural problems not visible until work begins
Without contingency, these surprises become crises. With it, they are just adjustments to the plan. Any good quotation from a contractor should include notes on assumptions — what the price is based on — so you understand what could change.
Working with contractors
A living room renovation often involves multiple trades: electrician, plasterer, joiner/carpenter, flooring specialist, painter/decorator, and possibly a structural engineer. You can either manage these individually or hire a general contractor to coordinate them.
When to hire a general contractor
- Your renovation involves structural work (removing walls, modifying chimney breasts)
- Multiple trades need to work in sequence over several weeks
- You do not have time to manage the project day-to-day
- The total budget exceeds $15,000
When you might manage it yourself
- The work is primarily cosmetic (painting, new flooring, new lighting fixtures)
- Only one or two trades are involved
- You have flexibility in your schedule to be available for questions and decisions
Getting quotes
Get at least three detailed quotations for any significant work. A good quote specifies exactly what is included, what is excluded, and what the payment schedule looks like. If a quote is significantly cheaper than the others, ask why — it may indicate missing items rather than a genuine bargain.
For more detail on finding and vetting contractors, read our guide on how to find a reliable contractor.
Common living room renovation mistakes
Learning from other people’s mistakes is cheaper than making your own.
Choosing flooring before finalising layout. Your layout determines traffic patterns, which affects flooring wear. A pale carpet where a coffee table will be pushed back and forth will show wear quickly.
Underestimating the impact of lighting. Many renovators spend thousands on flooring and paint, then plug in the same old lamp. Allocate 10-15% of your budget to lighting — it is worth it.
Ignoring socket positions. Plan where you will need power (lamps, TV, router, chargers, Christmas tree) and add sockets there. Moving sockets after decoration is expensive and disruptive. A common recommendation is one double socket per 3-4 linear metres (10-13 linear feet) of wall, plus dedicated sockets behind the TV unit.
Going open plan without thinking it through. Removing a wall between living room and kitchen is popular, but it means cooking smells, noise, and mess are always visible from the living area. Consider the trade-offs, not just the Instagram-worthy result.
Skipping the planning phase. Jumping straight to choosing paint colours without a proper plan leads to change orders mid-project, which cost time and money. Invest time in planning before any work begins — our renovation planning guide walks you through the process step by step.
Living room renovation checklist
Use this checklist to track your progress:
- Define your renovation scope and budget
- Measure the room and draw a floor plan to scale
- Decide on layout (furniture arrangement, focal point)
- Choose flooring material and order samples
- Design your lighting scheme (ambient, task, accent)
- Plan electrical work (sockets, switches, lighting circuits)
- Decide on storage (built-in vs freestanding vs open shelving)
- Plan fireplace updates (if applicable)
- Choose wall and ceiling treatments
- Consider window and door changes
- Get at least three contractor quotes
- Review quotes and agree on a scope of work
- Set aside 10-15% contingency
- Agree on a timeline with your contractor
Ready to plan your living room renovation?
A well-planned living room renovation makes your home more comfortable, more functional, and more enjoyable every single day. But good outcomes start with a clear plan and a well-defined scope.
Aikitektly helps you describe your renovation project faster and better than you could on your own, so you can send that description to contractors with confidence. Join our early access programme and be the first to try it.